
| 일 | 월 | 화 | 수 | 목 | 금 | 토 |
|---|---|---|---|---|---|---|
| 1 | 2 | 3 | 4 | 5 | 6 | |
| 7 | 8 | 9 | 10 | 11 | 12 | 13 |
| 14 | 15 | 16 | 17 | 18 | 19 | 20 |
| 21 | 22 | 23 | 24 | 25 | 26 | 27 |
| 28 | 29 | 30 | 31 |
- body-parser
- 2차조사법
- 이중연결리스트
- pytorch
- MSE
- 분리연쇄법
- bodyparser
- 힙정렬
- 이중해싱
- ML
- vsCode
- 딥러닝
- 선형회귀
- anaconda
- Loss함수
- 개방주소법
- downheap
- upheap
- 삽입식 힙
- 연결리스트
- POST
- urlencoded
- 상향식 힙
- 경사하강법
- 알고리즘
- 선형조사법
- nodejs
- 해시테이블
- Today
- Total
LittleDeveloper
AI 실무교육 2주차 (1) Neural Network 기초 (feat. Pytorch) 본문
Pytorch로 배우는 Neural Network
우리는 머신러닝을 처음 접하면서 회귀/분류 문제를 시작으로 여러가지 기법을 공부하게 된다. (물론 머신러닝으로 해결할 수 있는 과제가 회귀와 분류만 있는 것은 아님. 이 얘기는 추후 포스팅에서..)

머신러닝의 여러 방법론 중 하나로서 딥러닝이 있는데, 인공신경망을 바탕으로 컴퓨터에게 사람의 사고방식을 가르치는 방법이다. '인공신경망'이란 생물학의 신경망에서 영감을 얻은 학습 알고리즘으로, 사람의 신경 시스템을 모방한 것이다.
어떤 문제가 주어졌을 때 머신러닝으로만, 또는 딥러닝으로만 풀어야 한다는 정답은 없다. 그렇지만 딥러닝이나 전이학습(transfer learning)을 통해서 다른 모델보다 정확한 모델을 만들 수 있다. 이 경우, 파이토치(PyTorch)와 텐서플로우(TensorFlow)를 사용한다면 필요한 모델과 유사한 학습모델을 이들 라이브러리에서 임포트해서 쓸 수 있다.
🔎Pytorch vs Tensorflow
둘의 가장 큰 차이점은 '학습'에서 나타난다. tensorflow 는 fit() 함수로 간단하게 학습을 사용할 수 있지만, PyTorch는 함수 속 for 문을 정의하여 모델 학습(train)과 검증(test) 코드를 구현해야 한다.
더 자세한 사항은 아래의 링크에서 확인할 수 있다!
https://acdongpgm.tistory.com/231
[PyTorch] . Tensorflow(텐서플로) PyTorch(파이토치) 차이점 비교
딥러닝 튜토리얼에 등장하는 FashionMNIST 데이터 셋을 통해서 Tensorflow.Keras 와 PyTorch 모델링의 차이점을 정리해 보았습니다. 모델 정의 * 이해를 돕기 위해 subclass 형식으로 모델을 정의하였습니다.
acdongpgm.tistory.com
1. Pytorch란?
PyTorch는 Python을 위한 오픈소스 머신 러닝 라이브러리이다. Torch를 기반으로 하며, 자연어 처리와 같은 애플리케이션을 위해 사용된다. GPU사용이 가능하기 때문에 속도가 상당히 빠르다. (출처:위키백과)
🔽 공식문서
https://pytorch.org/docs/stable/index.html
PyTorch documentation — PyTorch 1.10.1 documentation
Shortcuts
pytorch.org
✅ Pytorch Basic - pytorch를 한번 사용해보자!
import torcht = torch.FloatTensor([0., 1., 2., 3., 4., 5., 6.])
print(t)
print(t.dim())  # rank. 즉, 차원
print(t.shape)  # shape
print(t.size()) # shape
* tensor.shape 과 tensor.size 는 동일한 기능!
print(t[0], t[1], t[-1])  # 인덱스로 접근

print(t[2:5], t[4:-1])    # 슬라이싱

print(t[:2], t[3:])       # 슬라이싱
#2D with Pytorch
t = torch.FloatTensor([[1., 2., 3.],
                       [4., 5., 6.],
                       [7., 8., 9.],
                       [10., 11., 12.]
                      ])
print(t)
print(t.dim()) # rank. 즉, 차원
print(t.size()) # shape
print(t[:, 1]) # 첫번째 차원을 전체 선택한 상황에서 두번째 차원의 첫번째 것만 가져온다.

print(t[:, 1].size()) # ↑ 위의 경우의 크기
print(t[:, :-1]) #첫번째 차원을 전체 선택, 두번째 차원에서는 맨 마지막에서 첫번째를 제외하고 다 가져옴
#뷰(View) - 원소의 수를 유지하면서 텐서의 크기 변경. ⭐⭐
import numpy as np
t = np.array([[[0, 1, 2],
               [3, 4, 5]],
              [[6, 7, 8],
               [9, 10, 11]]])
ft = torch.FloatTensor(t)
print(ft.shape)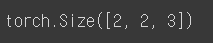
#3차원 텐서에서 2차원 텐서로 변경
print(ft.view([-1, 3])) # ft라는 텐서를 (?, 3)의 크기로 변경

print(ft.view([-1, 3]).shape)
print(ft.view([-1, 1, 3]))

print(ft.view([-1, 1, 3]).shape)
#스퀴즈(Squeeze) - 1인 차원을 제거한다
ft = torch.FloatTensor([[0], [1], [2]])
print(ft)
print(ft.shape)
print(ft.squeeze())
print(ft.squeeze().shape)
#언스퀴즈(Unsqueeze) - 특정 위치에 1인 차원을 추가
ft = torch.Tensor([0, 1, 2])
print(ft.shape)
print(ft.unsqueeze(0)) # 인덱스가 0부터 시작하므로 0은 첫번째 차원을 의미한다.
print(ft.unsqueeze(0).shape)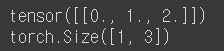
#view를 써도 위와 동일한 결과!
print(ft.view(1, -1))
print(ft.view(1, -1).shape)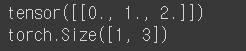
#두번째 차원에 1인 차원을 추가하면 (3, 1)
print(ft.unsqueeze(1))
print(ft.unsqueeze(1).shape)
#마지막 차원에 1인 차원을 추가하면 (3, 1)
print(ft.unsqueeze(-1))
print(ft.unsqueeze(-1).shape)
lt = torch.LongTensor([1, 2, 3, 4])
print(lt)
print(lt.float())
bt = torch.ByteTensor([True, False, False, True])
print(bt)
print(bt.long())
print(bt.float())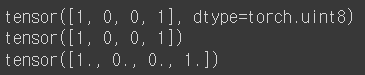
#Concatenate
x = torch.FloatTensor([[1, 2], [3, 4]])
y = torch.FloatTensor([[5, 6], [7, 8]])
print(torch.cat([x, y], dim=0))
x = torch.FloatTensor([1, 4])
y = torch.FloatTensor([2, 5])
z = torch.FloatTensor([3, 6])
print(torch.stack([x, y, z]))
#unsqueeze(0)을 하므로서 3개의 벡터는 전부 (1, 2)의 크기의 2차원 텐서
print(torch.cat([x.unsqueeze(0), y.unsqueeze(0), z.unsqueeze(0)], dim=0))
print(torch.stack([x, y, z], dim=1))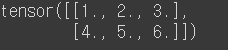
x = torch.FloatTensor([[0, 1, 2], [2, 1, 0]])
print(x)
print(torch.ones_like(x)) # 입력 텐서와 크기를 동일하게 하면서 값을 1로 채우기
print(torch.zeros_like(x)) # 입력 텐서와 크기를 동일하게 하면서 값을 0으로 채우기
'AI' 카테고리의 다른 글
| Pytorch로 시작하는 딥러닝 입문- 7. CNN (0) | 2022.03.16 |
|---|---|
| Pytorch로 시작하는 딥러닝 입문- 6. 인공신경망 (0) | 2022.03.09 |
| 모두의 딥러닝 4장 경사하강법 (0) | 2022.01.09 |
| 모두의 딥러닝 3장 선형회귀법 (1) | 2022.01.08 |
| AI 실무교육 1주차 (2) 가상환경 세팅(feat. Anaconda) (0) | 2022.01.08 |


